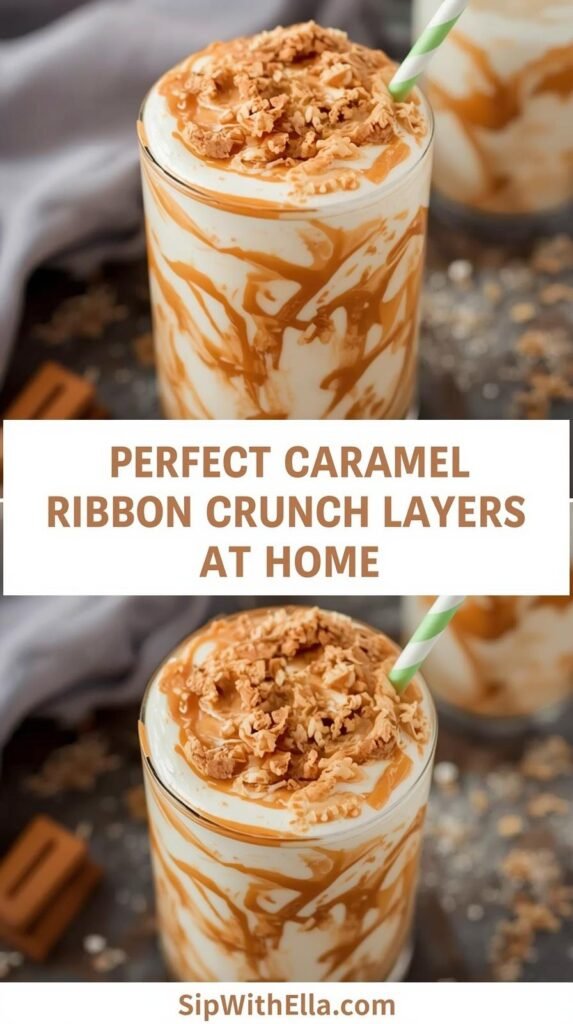
If you’ve ever ordered a Caramel Ribbon Crunch Frappuccino at Starbucks and spent the entire drive home thinking “I need to figure out how to make this myself,” you’re in exactly the right place. Those gorgeous layers, dark caramel sauce ribboned through creamy frappuccino, topped with crunchy caramel drizzle and whipped cream, look complicated but are completely achievable at home once you understand what each layer actually is and how it behaves.
The result? A stunning, restaurant-quality drink that costs a fraction of the café price and tastes genuinely better because you made it fresh.
I spent a genuinely embarrassing amount of time reverse-engineering this drink before I cracked the layering technique. Now I’m handing you the shortcut.
Table of Contents
Understanding What “Caramel Ribbon Crunch” Actually Means
Before you can replicate something perfectly, you need to understand what you’re actually replicating. The Caramel Ribbon Crunch isn’t just caramel in a frappuccino, it’s a specific layered construction with distinct components at different points in the drink.
The Three Core Layers
The original drink uses three caramel elements that each behave differently:
1. The caramel sauce ribbons — thick, dark caramel that gets applied to the inside walls of the cup and layered through the frappuccino base. This creates those visible ribbon streaks throughout the drink.
2. The frappuccino base — the blended coffee-cream layer that holds everything together. It needs to be thick enough to suspend the caramel ribbons without them immediately sinking to the bottom.
3. The caramel crunch topping — caramel-coated crunchy bits on top that add texture contrast and the distinctive “crunch” the drink is named for.
Understanding these three elements separately is the key to perfecting the caramel ribbon crunch layers at home. Each one requires a slightly different technique, but none of them are difficult once you know what you’re doing.
Component 1: The Caramel Ribbon Sauce
Choosing the Right Caramel
Not all caramel sauces create proper ribbons. Thin, pourable caramel runs too fast and blends immediately into the frappuccino base instead of holding its ribbon shape.
You need a thick, viscous caramel that holds its form when applied to the side of a glass and stays defined as layers in the drink.
Store-bought options that work well:
- Ghirardelli Dark Caramel Sauce — thick, rich, and the closest match to Starbucks’ caramel in both color and consistency
- Torani Caramel Sauce (the thick sauce version, not the syrup) — widely available and behaves correctly
- Homemade thick caramel sauce — takes 15 minutes and produces the best result by far
For the best caramel ribbon effect, you want the sauce at room temperature, not cold from the fridge (too thick and sticky), not warm (too runny).
Room temperature caramel holds its ribbon shape while still flowing slowly enough to create those beautiful streaks.
Making Homemade Thick Caramel Sauce
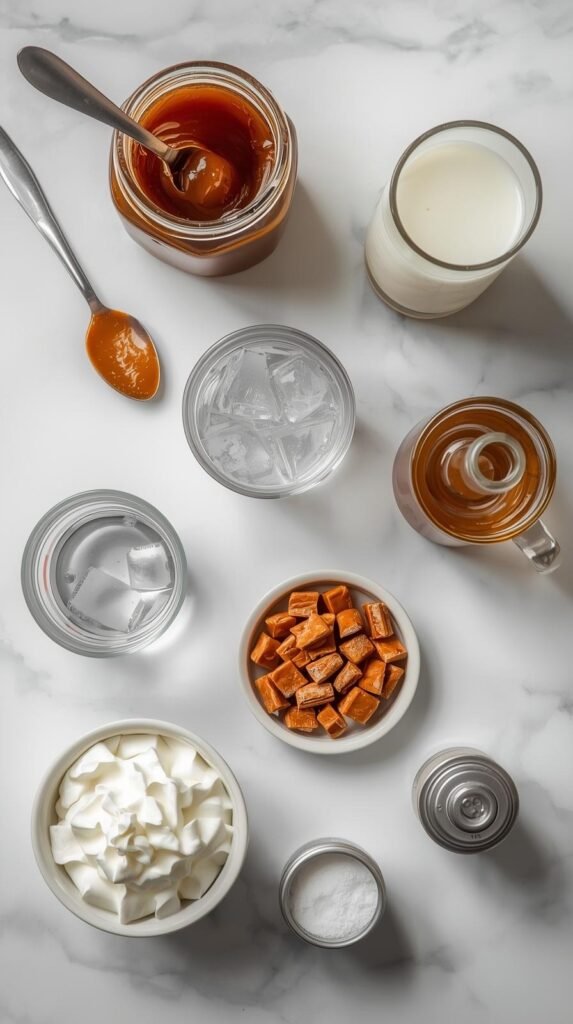
- 1 cup granulated sugar
- 6 tablespoons unsalted butter, cut into pieces
- ½ cup heavy cream, at room temperature
- 1 teaspoon vanilla extract
- ½ teaspoon sea salt (for salted caramel, highly recommended)
Method:
- Heat sugar in a heavy-bottomed saucepan over medium heat, stirring constantly until fully melted and deep amber in color, about 8–10 minutes. Watch it carefully; caramel goes from perfect to burnt in about 30 seconds
- Add butter pieces carefully, the mixture will bubble aggressively
- Stir constantly for 2–3 minutes until butter fully incorporates
- Add heavy cream slowly while stirring, more bubbling, keep stirring
- Remove from heat, add vanilla and salt, stir to combine
- Cool to room temperature before using for ribbons
The result is a thick, glossy, deeply flavored caramel that ribbons beautifully and stays defined in a cold drink. IMO, this homemade version outperforms every store-bought option significantly, especially for the ribbon layering technique.
Component 2: The Frappuccino Base
Getting the Thickness Right
The frappuccino base thickness is what makes or breaks the caramel ribbon effect. Too thin and the caramel sinks immediately. Too thick and it becomes difficult to drink.
You want a thick, milkshake-like consistency that holds its shape briefly in a spoon before slowly settling.
Basic Caramel Frappuccino Base Recipe (Serves 1):
- 1 cup strong brewed coffee, cooled completely (or 2 shots espresso + ½ cup water)
- ½ cup whole milk
- 2 tablespoons caramel sauce (mixed into the base, not the ribbon)
- 2 cups ice
- 2 tablespoons heavy cream (adds richness and thickness)
- 1 tablespoon vanilla simple syrup
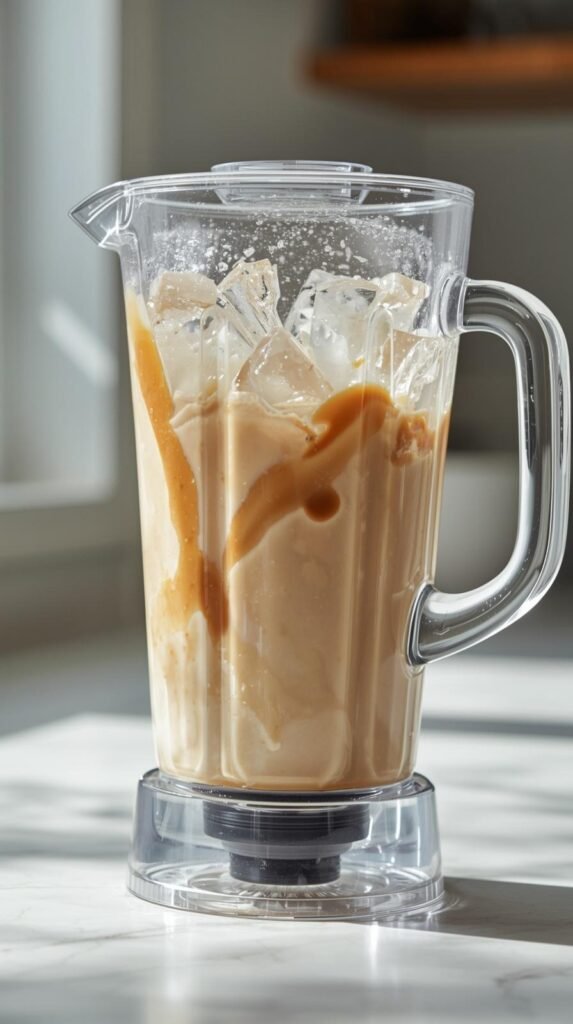
Method: Blend on high for 30–45 seconds until completely smooth and thick. Check consistency, it should pour slowly and hold a slight mound shape briefly. If it seems too thin, add 2–3 more ice cubes and blend again for 15 seconds.
If it seems too thick to pour, add a small splash of milk. The consistency checkpoint matters enormously for the ribbon technique that follows.
Component 3: The Caramel Crunch Topping
What Creates the “Crunch”
The Starbucks version uses proprietary caramel ribbon crunch topping, essentially caramel-coated crunchy pieces that add texture to the top of the drink. You can replicate this at home using one of three approaches:
Option 1: Toffee bits, Heath Bar toffee bits from the baking aisle work nearly perfectly. They’re buttery, caramel-flavored, and have exactly the right crunch.
This is my go-to because they’re widely available and require zero prep.
Option 2: Crushed caramel candies, Werther’s Originals or similar hard caramel candies, crushed into rough pieces. The flavor is spot-on and the irregular size creates a nice rustic texture.
Option 3: Homemade caramel crunch, Spread thin caramel sauce onto a parchment-lined baking sheet and bake at 350°F for 8–10 minutes until it hardens and becomes brittle. Cool completely, then break into irregular shards.
This produces the most authentic result and looks absolutely stunning on top of a finished drink.
The Layering Technique: Step by Step
Here’s where it all comes together. This technique takes about 60 seconds of focused attention and produces a genuinely beautiful result every time.
Step 1: Prep Your Glass
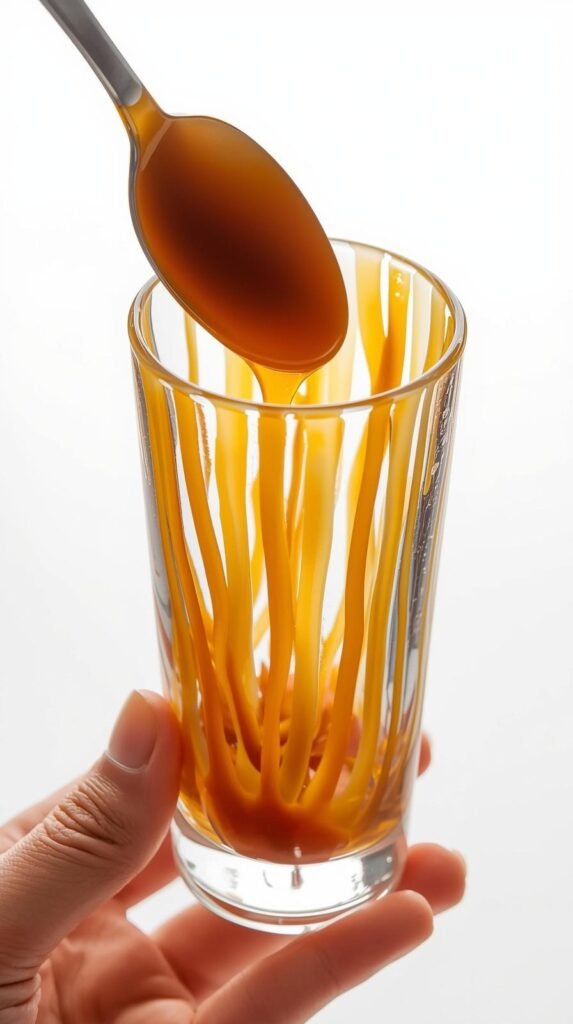
Use a tall, clear glass, the visual effect of ribbons is the whole point, so a clear glass is non-negotiable. Take your room-temperature thick caramel sauce and apply it to the inside walls of the glass before adding anything else.
Hold the glass at a slight angle and drizzle caramel around the interior rim, letting it run down the sides in uneven ribbons. Rotate the glass slowly as you apply for full coverage. Set aside.
Step 2: Pour Half the Frappuccino Base

Pour half your blended frappuccino into the prepared glass. The thick base will push slightly against the caramel ribbons on the walls, creating that classic ribbon streak effect without disturbing them completely.
Step 3: Add the Middle Caramel Layer
Drizzle 1–2 tablespoons of caramel sauce directly over the surface of the first frappuccino layer. Use a circular motion and work from the outside edge inward.
The caramel sits on top of the dense frappuccino briefly before slowly creating interior ribbons as you add the next layer. Don’t stir, you want the ribbons to stay defined.
Step 4: Add the Remaining Frappuccino
Pour the second half of your frappuccino base over the caramel middle layer. Pour slowly and deliberately, a rushed pour disturbs the caramel layer below and merges everything before you’re ready.
Step 5: Add Whipped Cream
Pipe or spoon a generous mound of whipped cream on top. Real whipped cream that holds its shape works better than the aerosol can version for this application, it stays defined and provides a proper surface for the toppings.
Step 6: Apply the Final Caramel Ribbon and Crunch

Drizzle caramel sauce over the whipped cream in a crosshatch or spiral pattern. Then immediately apply your caramel crunch topping generously over the entire whipped cream surface. The caramel drizzle acts as a light adhesive that holds the crunch pieces in place rather than letting them roll off the cream.
Common Layering Mistakes and How to Fix Them
These are the errors that most home attempts run into on the first try:
- Caramel too cold from the fridge: It won’t ribbon properly, it’ll clump and stick rather than flow. Always bring caramel to room temperature first
- Frappuccino base too thin: Caramel sinks immediately instead of staying ribboned. Blend with more ice to achieve proper thickness
- Pouring too fast: Rushing the second layer pour disturbs the caramel middle layer. Pour slowly over the back of a spoon for the gentlest possible addition
- Applying caramel to a wet glass: Dry the inside of your glass before applying the wall ribbons, moisture causes caramel to slide down in sheets rather than holding as defined ribbons
- Using aerosol whipped cream for the top layer: It deflates too quickly under the caramel drizzle and crunch topping. Use real whipped cream for a result that holds properly
Putting It All Together: Practice Makes Perfect
The honest truth about perfecting caramel ribbon crunch layers at home is that the first attempt produces a good drink, and the second or third produces a stunning one.
The technique becomes intuitive quickly, you develop a feel for the right caramel consistency, the right frappuccino thickness, and the right pouring speed that no written instructions can fully replace.
Make it once this weekend. Take note of what worked and what you’d adjust. By the third time, you’ll produce a drink that looks exactly like the café version, and tastes better because every element is fresh and made to your taste
The caramel ribbon crunch is absolutely achievable at home. It just takes one attempt to prove it to yourself.

Caramel Ribbon Crunch Frappuccino (Homemade)
Equipment
- Blender
- Tall clear glass
- Measuring cups
- Spoon
- Whisk
Ingredients
Frappuccino Base
1 | cup | strong brewed coffee, cooled
½ | cup | whole milk
2 | tbsp | caramel sauce
2 | cups | ice
2 | tbsp | heavy cream
1 | tbsp | vanilla syrup
Layers & Topping
3 | tbsp | thick caramel sauce
¼ | cup | whipped cream
2 | tbsp | toffee bits or caramel crunch topping
Instructions
Step 1
Drizzle caramel sauce around the inside walls of a tall glass to create ribbon streaks.
Step 2
Blend coffee, milk, caramel sauce, ice, heavy cream, and vanilla syrup until thick and smooth.
Step 3
Pour half of the blended frappuccino into the prepared glass.
Step 4
Drizzle caramel sauce over the first layer to create the middle caramel ribbon.
Step 5
Pour the remaining frappuccino mixture on top slowly.
Step 6
Top with whipped cream, a caramel drizzle, and caramel crunch topping.
Notes
- Use thick caramel sauce for proper ribbon layers
- Room-temperature caramel creates better ribbon streaks
- The frappuccino base should be thick like a milkshake
- Pour the second layer slowly to keep the caramel ribbons intact
- Toffee bits make the easiest caramel crunch topping
- Serve immediately for best texture and flavor